
How to Improve the Site Speed of Your Ecommerce Store in 15 Steps
When it comes to the website speed of your ecommerce store, slow and steady doesn’t cut it. Use these 15 steps to keep more of your hard-earned traffic.

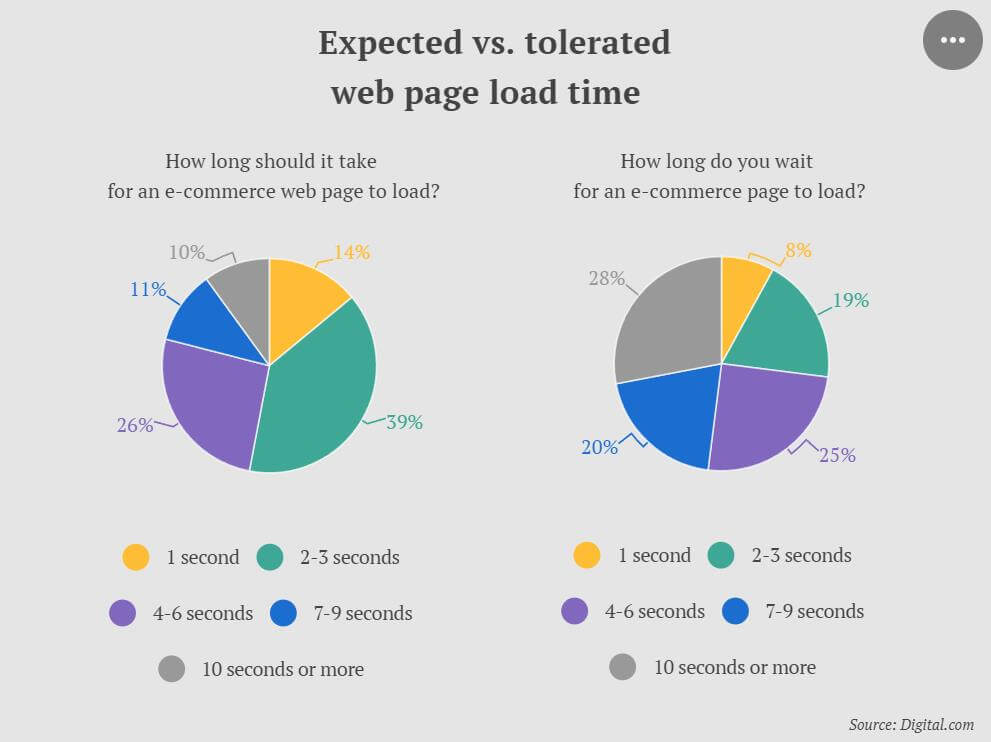
Ecommerce shoppers don’t settle for slow sites. And the definition of “slow” is more restrictive than ever.
A Digital.com study found that 53% of online shoppers expect ecommerce stores to load in less than three seconds. They also learned that half of shoppers will abandon a full shopping cart if pages don’t load fast enough.
This means that site speed matters. It matters to the user experience, it matters to your SEO outcomes, and it matters to your conversion rate.
In this article, we’ll point you towards tactics that can help you improve your site speed and keep more of your hard-earned traffic. After all, a small tweak in website performance could boost your ecommerce revenue and deliver a favorable return on investment.
What is Site Speed?
Site speed refers to the length of time it takes for your web pages to load. It’s measured in seconds or fractions of seconds.
When a user clicks on a page, their browser sends a bunch of HTTP requests to the website’s host server. The browser asks for text, image files, scripts, and other elements. The server has to respond to each request by providing the appropriate element.
The gap between the initial request sent and you being able to view that information is the load time. It’s not a terribly complicated concept, but the protocols and delivery systems can get complex.
This means that site speed is affected by lots of variables: the type and amount of content, connection type, device type, operating system, browser, and even the distance between the user and the host server.
When we talk about site speed, we’re almost always referring to speed from the user’s perspective. The user wants a functional page. They generally don’t care about what’s going on in the background as long as they can interact with the page.
We can improve a website load speed by 1) reducing the number of elements to be loaded, 2) making the individual elements load faster, and 3) reorganizing the order elements load so the things users care about appear first.
Why is Site Speed Important
Your website speed is key to the performance of your ecommerce store and your growth as a brand. In an age where users expect high performance, you can’t afford to be the slow store that frustrates users. Let’s talk about why site speed matters.
Reputation
Your site speed might be the first impression your brand makes. Visitors will make assumptions about your business based on your site’s performance.
If your site loads slowly, there’s a good chance visitors will see you as unsafe, ill-prepared, and untrustworthy. In fact, 79% of online shoppers say they won’t go back to a website if they aren’t happy with its loading speed.
But if your site loads quickly, visitors will see you as a reliable and professional operation that takes their time and the potential transaction seriously. It’s the kind of thing that instills trust and confidence early in the relationship.
Conversion rate
Slow websites actually sell fewer products!
In an Unbounce survey, nearly 70% of consumers admit that page speed influences their likelihood to buy. They either don’t want to wait for the page to load, or they associate slow loading with untrustworthiness. You don’t want to fall into either category.
How fast do you need to be to convert? According to a study by Portent, a 0-4 second loading time is a good target, but the highest ecommerce conversion rates occur on pages that load in under two seconds.
Furthermore, each additional second of delay reduces conversion rates by 2.11%. A store that loads in one second has a conversion rate 2.5x higher than a site that loads in 5 seconds.
Bounce rate
Your bounce rate is a key web performance metric. It refers to the percentage of visitors who visit your site and leave after only viewing one page. This metric is influenced by many different factors, such as your design, layout, relevancy to their search, and your site speed.
Naturally, visitors who bounce off your site without viewing subsequent pages are highly unlikely to convert. Even if a shopper is primed to buy, they still need to visit multiple pages, such as the product detail page, shopping cart, checkout, and thank you page.
Simply put, a page’s load time directly impacts bounce rate. Visitors are more likely to bounce off sites that take longer to load. The Digital.com report we mentioned earlier suggests that countless ecommerce sites could get more visitors to stay, and not bounce from the site immediately, by making their sites load faster.
Google’s research shows that the chance of a bounce increases by 32% when a page load time went from one to three seconds, and increases by 90% when the page load time went from one to five seconds. If a site takes 10 seconds to load, nearly everyone leaves.
Organic traffic and SEO (search)
Search engines live and die based on the user experience they deliver. Providing the highest quality results to searchers is how Google came to dominate the business. Since users don’t like websites with slow-loading pages, search engines don’t either.
Your site speed can cause your site to be penalized by the algorithm that determines which pages show where on the search engine results page (SERP). In 2010, Google stated that its search algorithm would start taking speed into account when ranking search results. In 2018, Google confirmed that speed is also a factor when ranking mobile sites.
Then in 2021, Google introduced the page experience update. This update includes core web vitals, which are a group of loading speed-related metrics that impact the user experience. In a Google AMA, Philip Walton, a Google engineer who works on web performance, said that while core vitals aren’t the end-all-be-all factor, Google takes them seriously.
The chart below is typical of studies comparing search engine page rank position to click-through rates (CTR). Note how the top position gets the lion’s share of attention, then CTR drops off sharply as page rank declines. Once you get beyond the first page of the SERP, your chances of drawing an organic click are slim indeed.
User experience
It’s no secret that we’re impatient. We don’t want to wait for the web. We want it right now. The human attention span is only 8.25 seconds, which is 4.25 seconds less than in the year 2000. So when something takes too long to load, it creates friction and disrupts the experience.
Your customers may be loyal, but at the end of the day, their real loyalty is to their own needs. If they feel that your site makes it difficult or impossible to get the products they want (due to slow website load speed), they will simply shop somewhere else.
What Factors Affect Site Speed?
Let’s look now at the fundamental factors involved in page load time and some best practices to improve your site speed. If you don’t get these six things right, your site speed will suffer and you’ll miss out on conversions:
1. Image size
This is the factor most people think of when load time is discussed. Many website owners make the mistake of uploading images that are too large. Yes, you can scale them down to fit the space, but that means you’re loading a larger file size than you need, which is just more data you’re asking the server to transmit.
The quality of the image also affects its size. Does every image on your site need to be high resolution? Or would it look fine if you removed a few of those pixels? Compression can help you reduce the file size of your images to make your pages load quicker.
2. Number of HTTP requests
Each element your site needs to display a page has to be requested from the website’s server. More requests mean “talking” between server and browser. More talking means more loading.
How many HTTP requests are too many? That’s hard to answer because it also depends on the size of the requests and how long it takes the server to reply. Some requests are big, like videos and high-resolution photos, and some servers respond slowly.
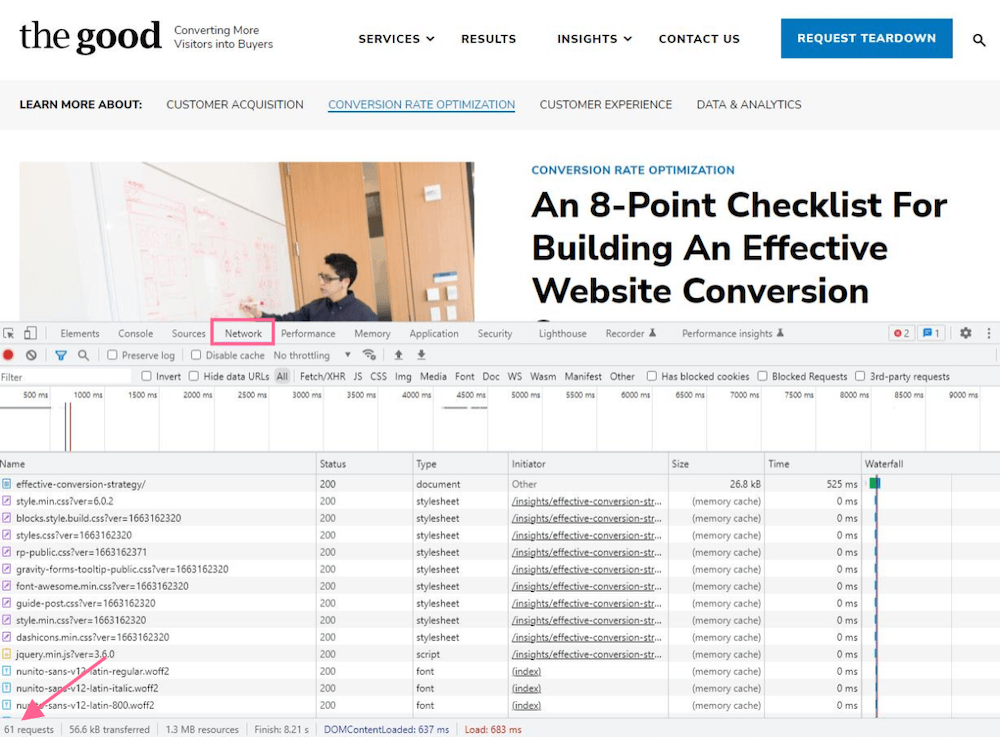
You can check the number of HTTP requests your site makes using Chrome’s Developer Tools. Visit a page you want to test, right-click anywhere and choose the “Inspect” menu item. Refresh the page, visit the Network tab, and view the total number of requests at the bottom left.
3. Compression
Compression is the process of reducing the size of files without affecting their function or quality (too much). By compressing your site, you make each element smaller and quicker to retrieve. Ultimately, this creates a significant performance boost.
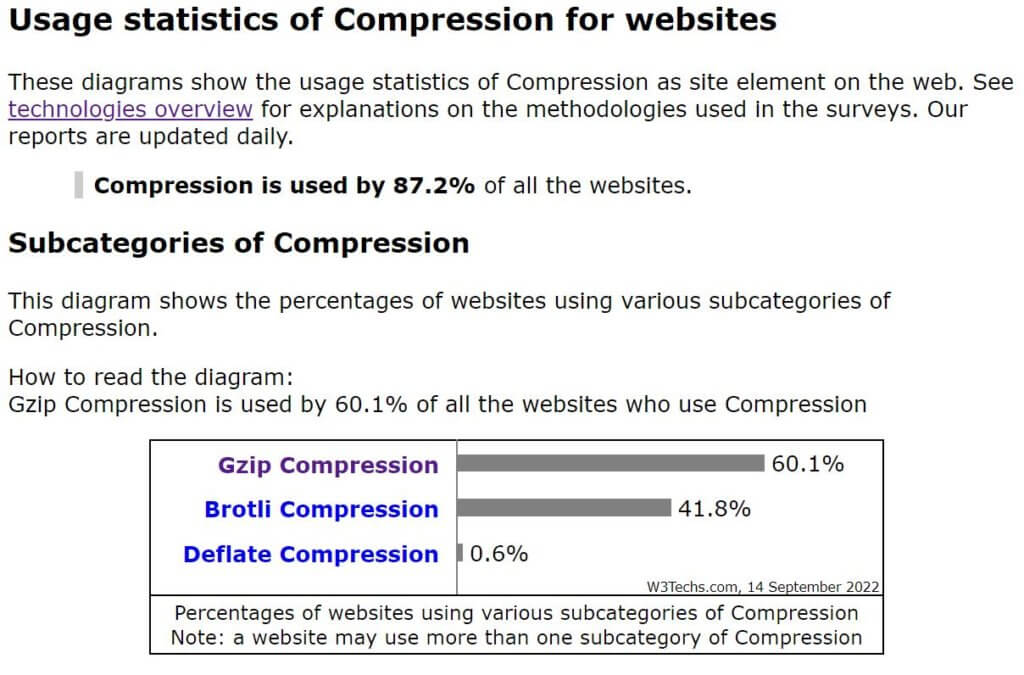
Compression is so important that almost all sites use it. According to W3Techs, 87.2% of websites use compression to some degree.
The good news is that this process isn’t that difficult to manage. Advances in compression technology have been a huge factor in allowing code-heavy websites to load in a reasonable time.
Your hosting provider or ecommerce platform probably enables compression by default, but the impact here is too great to assume. Check with either party to confirm.
Enjoying this article?
Subscribe to our newsletter, Good Question, to get insights like this sent straight to your inbox every week.
4. HTML and CSS code optimization
It’s remarkable how often extra code sneaks its way into your site. You think, “This plugin won’t hurt,” or “One more app isn’t too much.” Before you know it, your site is a patched-together conglomeration that’s completely bloated.
It may be time to lose some weight. By getting rid of “code bloat,” you can streamline the calls and responses, so your site speed gets faster. Code optimization is essential to website optimization.
5. Caching
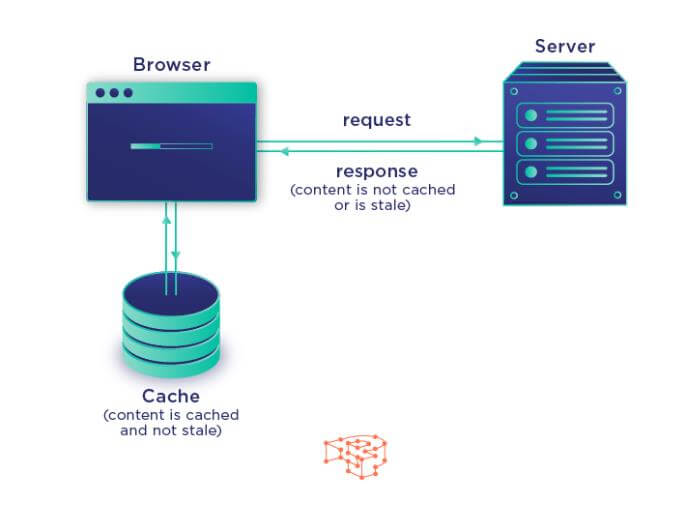
Caching is the process of storing information that has already been requested. By keeping this data on hand, there’s no need for the browser to request it on subsequent visits to the site. Site speed increases because many of the elements are already loaded.
Your server works with the user’s browser to note which files aren’t apt to change often and which are. Your logo, for instance, probably won’t be rendered any differently today than it will be next week, so there’s no reason for it to be called up again on the next visit.
Caching is why you may sometimes be told to “clear your cache” in order to see a change in a website. This forces your browser to abandon what it has saved and request everything anew.
6. Hosting location
Your website is essentially a collection of files. Those files have to exist somewhere. As we said earlier, your browser must collect data from those files to display the website. That data has to flow from point A (the host server) to point B (your computer, smartphone, or tablet).
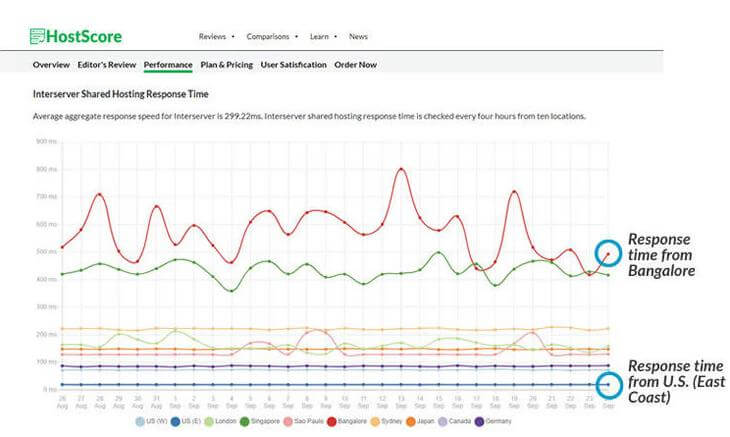
This means the distance between both points can affect the page loading time. Servers that are close to your customers will transmit data quickly, and those users will enjoy fast loading times. Servers far from your customers will create poor latency.
Check out this graph of response times of a site hosted in the eastern US. Visitors who access the site from nearby see near-instant loading times, while international visitors see slow (and variable) loading.
Obviously, your host can’t be located next to all of your visitors, but you can distribute your site across many servers so your visitors can access the nearest one. We’ll get to this in a moment.
Bonus: What if I’m on Shopify?
Another key factor that not only affects site speed–but also how much you can optimize the speed–is if you’re on Shopify. The system controls the majority of the platform and codebase, so you have to focus on the limited areas that are under your influence.
Make sure you are optimizing everything you put into your CMS, for example, image sizes and tracking pixels/javascript code. You can also be selective about what plugins you install to make sure your site is running at the highest speed possible. You can learn more about optimizing your Shopify store’s speed here.
How to Improve Your Site Speed
Now that you understand why site speed is important and what affects it, let’s get into the good stuff: How to improve your site speed. These best practices are key to lowering your page loading times and, ultimately, getting more site conversions.
Step 1: Check your current site speed
Before you start optimizing to improve your site speed, it’s smart to get a baseline by running a website speed test. This will help you determine if your optimizations have any effect.
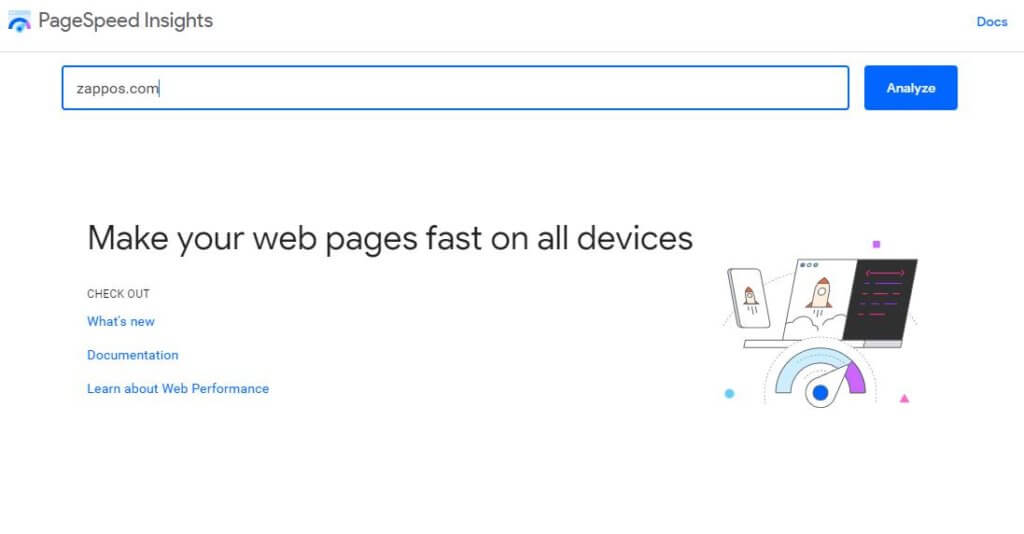
We recommend using Google PageSpeed Insights. This easy-to-use tool measures the speed of your web pages on desktop and mobile devices. And since it’s run by Google, you can make sure your performance is up to par for search ranking purposes.
To use PageSpeed Insights, enter the URL of the web page you want to test and hit the “Analyze” button.
After a few seconds, Google will produce a site speed report. You’ll see an overall score followed by some important metrics.
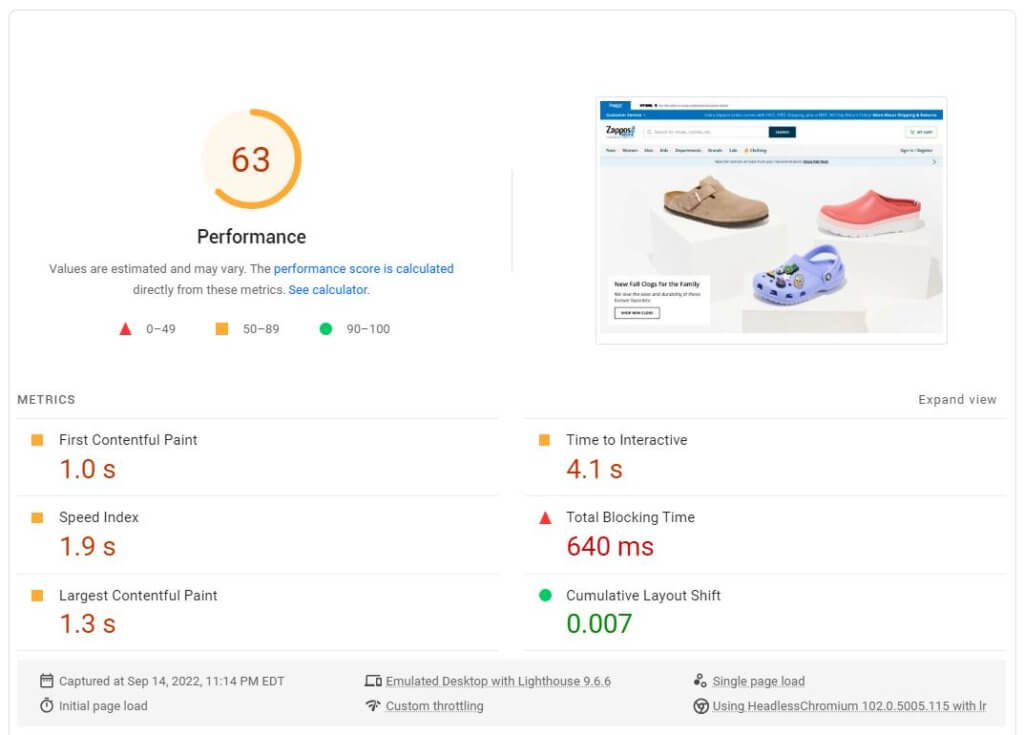
Here’s what those site speed metrics mean:
- First Contentful Paint refers to when your browser renders the initial information, including images, text, non-white canvas, and SVGs.
- Time to Interactive measures the amount of time it takes for elements to become accessible to the user. For instance, if there’s a video on the page, the time it takes to play that video would affect this metric.
- Speed Index measures the time it takes for all elements above the fold (that is before the user has to scroll) to become visible.
- Total Blocking Time refers to the time between the first contentful paint and the time between time to first contentful paint and the point where the page becomes interactive.
- Largest Contentful Paint measures the time it takes for the browser to render the largest bits of information.
- Cumulative Layout Shift refers to unexpected shifts in layout. Well-coded pages load in a way that makes them usable right away, but if elements that load later force the page to shift around, users will struggle.
If your page received a low score, don’t worry! As Google explains, the score considers several factors that you can address. The score can also fluctuate based on unique circumstances, such as changes in internet traffic routing, changes in ads, antivirus software, A/B tests you’re running, and more.
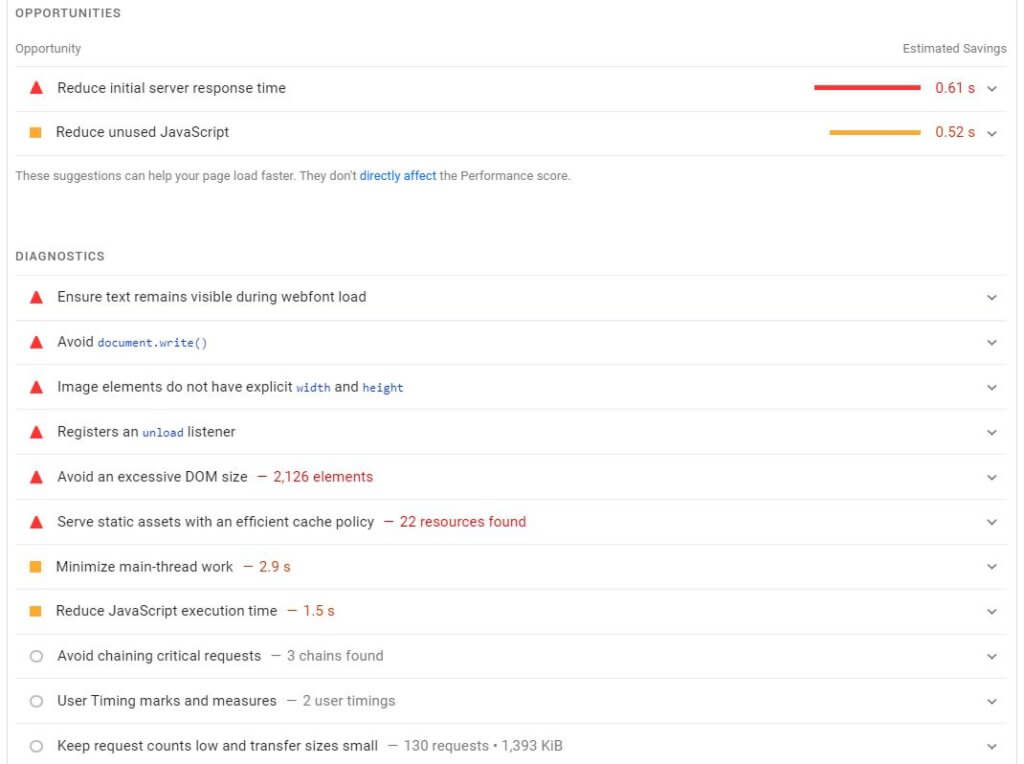
Below the score, Google provides a list of opportunities and diagnostics. You or your developer should go through each section (click the drop-down button to see more) to improve your page load time. Google literally tells you what to do.
Step 2: Use fewer redirects
A redirect tells the browser to visit a different page instead of the intended one. Redirecting doesn’t take long, but it’s one extra step for the browser to complete. While there are plenty of legitimate uses for redirects (especially for SEO purposes), it’s best to eliminate them wherever possible.
Step 3: Use a content delivery network (CDN)
Earlier, we mentioned that distance from the server can affect loading time. Your site will always be far from someone, right? Well, not quite.
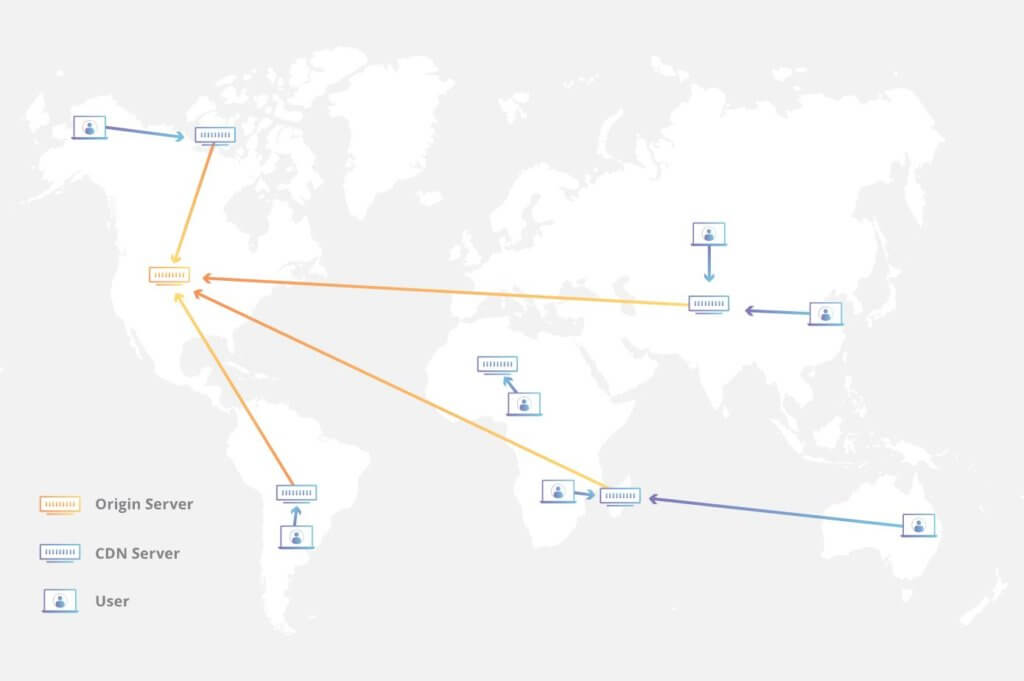
A content delivery network is a network of servers that store cached versions of your site in multiple locations, so it’s as close to all of your users as possible. You wouldn’t want a user in France to access a server in Chicago, but with a CDN, that user could access a server in Ireland or Sweden and view a much faster site.
Your hosting provider may offer a CDN. If not, your best options are MaxCDN or Cloudflare. Cloudflare also offers security and optimization features that may also add value for you.
Step 4: Reduce the number of plugins and widgets
Plugins, scripts, modules, apps, and other elements make your pages bigger and force browsers to request more data from the host server. You can boost your page loading time by simply removing them.
This is a mixed bag, of course. Those extras you love to install offer functionality you might miss, which may affect your conversion rate and revenue. For instance, if a particular plugin boosts your conversion rate by 2%, but the conversion gain by removing the plugin is only 0.25%, you may be better with the slower page. You’ll have to make these calculations carefully.
Run a speed test (using the tutorial in step one) with all of your plugins and apps installed. Then experiment by turning them off one at a time and running additional tests. This will help you identify the ones that affect your site speed. If one plugin makes your site sluggish, you can decide whether you really need it.
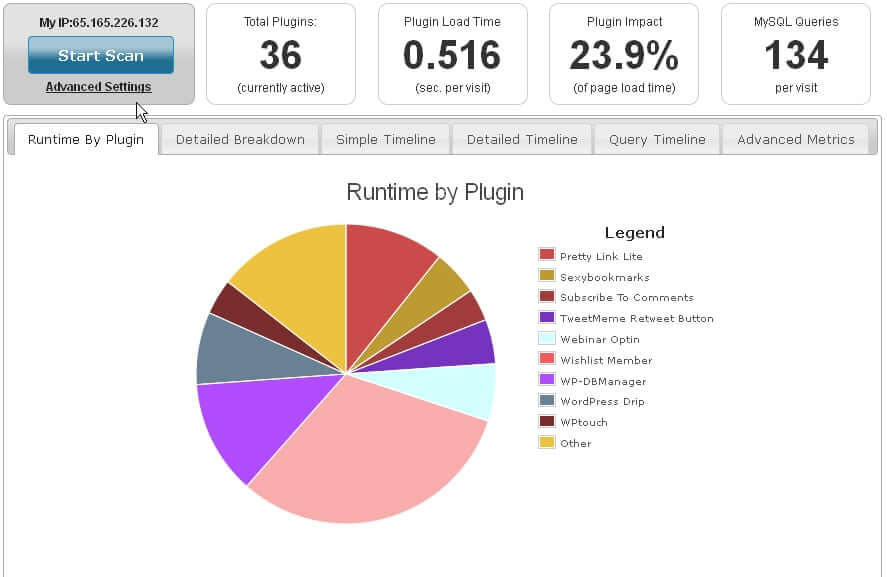
Plugin Performance Profiler is another good option for finding problematic plugins. It’s also faster than manually deactivating plugins and running loading speed tests. Install the profiler, run a scan, and you’ll get a report like this that explains how each plugin is performing.
Step 5: Minify your HTML, CSS, and JavaScript
A website naturally accumulates multiple CSS files and JavaScript files. Each file requires a separate HTTP request. An easy way to limit requests is to combine them into one of each type. That is, you should only have one stylesheet for your whole site, one JavaScript file, etc.
When developers write code, they include spaces, notes, and other marks to keep their work organized, clean, and accessible to other developers. But browsers don’t need any of that. Every unnecessary character adds to your loading time, so you should extract it all.
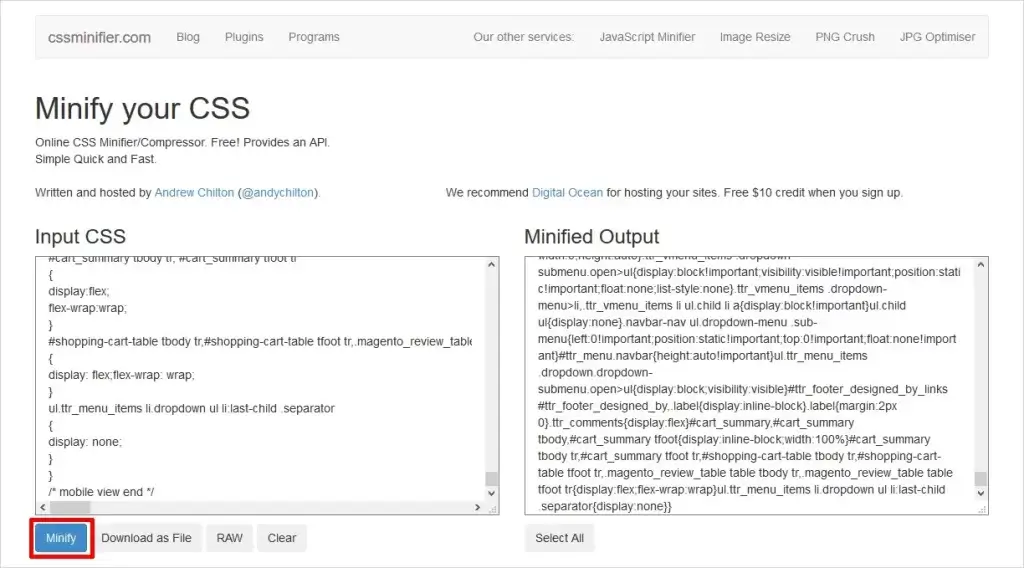
No, you don’t have to go through every line manually. You could paste your tool into a minifier such as Toptal’s CSS Minifier.
Your host or ecommerce platform likely offers a tool to minify your code. There are also plugins and third-party apps available. Google recommends using CSSNano and UglifyJS.
Step 6: Include the trailing slash
The trailing slash is the final “/” at the end of your URL. It tells the server that this page is the final destination and there are no file directories to search.
Instead of this: yourstore.com/shoes
Your URLs should be this: yourstore.com/shoes/
Your ecommerce platform should have a tool to change the permalink structure. If not, you’ll need to add a quick line of code to the .htaccess file on your server. Ahrefs has a quick guide to do that. This isn’t a huge speed boost, but every millisecond matters.
Step 7: Size your images for their containers
Manually resize your images so they are only as big as you need them to appear on a screen. If you need an image that will appear as 300 pixels wide, for instance, then you should upload an image that’s exactly 300 pixels wide. Scale them down manually in a photo editor before uploading them to your media library.
Some content management systems will do this automatically for you. Shopify, for example, makes several copies of each image you upload at various pre-set sizes. You can choose any of these size options when you publish an image. You can also create custom size options of your own to select at publishing.
Step 8: Compress all of your files
You can reduce all of your file sizes with an application called Gzip. This process can shrink a file by up to 80%, resulting in faster page loading. It’s a bit technical, but basically, Gzip locates strings of similar code in your files and temporarily replaces them to reduce the file size.
Your ecommerce platform, content management platform, or host may offer Gzip as a feature. If not, this Gzip guide will help you install and implement it. Enter your URL on a Gzip compression test to see if your site has it already.
You should not use Gzip on images, though compression is still important. Compression reduces the overall file size of an image. As a general rule, you should never have an image larger than 1MB.
To compress images, simply resave them in a photo editor. In Photoshop, for instance, you can adjust the image size when you save. Notice how the quality of the image changes slightly. Find the smallest size with suitable quality for your needs.
Additionally, you can add apps, plugins, and other tools to your ecommerce platform to manage this process at scale. Your hosting provider or ecommerce platform may offer their own solutions.
Furthermore, turn commonly used images like buttons and icons into CSS sprites. A CSS sprite combines multiple images into one large image that loads all at once, thereby causing fewer HTTP requests. This also makes browsing subsequent pages faster because more assets are in the cache.
Step 9: Improve server response time
Your server response time is the speed that it replies to browser HTTP requests. It’s affected by the amount and type of resources on the page, the software used by the server, and the amount of traffic you receive. (You’ve undoubtedly tried to visit a busy website and found it responding slowly.)
The ideal server response time is under 200ms. To improve this, identify bottlenecks that slow everything down, such as inadequate memory, slow routing, or slow database queries. You can ask your hosting provider to solve a slow response time for you, or you may need a developer to help you out. PhoenixNAP has a great tutorial on reducing server response time.
Step 10: Enable server-side and browser caching
Caching is one of the most effective ways to improve your site speed. This is the practice of letting the server and/or browser save data (images, scripts, stylesheets, and more) for subsequent page views. This way, the visitor won’t need to reload the entire page in the future.
Server-side caching is a service your web host should provide. If they don’t offer this, find a new hosting provider because it’s an important feature.
Your visitors’ browser will also cache your content. You can adjust your cache control in your .htaccess file, Nginx configuration file, or directly in your PHP code. You can prevent the browser from caching at all, set it as public (cached by anyone) or private (cached by browser, but not third parties), set the cache to expire at a certain time (thereby forcing the browser to request fresh data), and more.
Frankly, this can be a bit technical. You or your developer should check out Pressidium’s tutorial on caching.
Step 11: Choose the right web host
Web hosting is like anything else: You get what you pay for. Cheap web hosting sounds good, but it may handcuff you to slow site speed. Shared hosting is the least expensive, but surges in traffic to other sites on the same server can slow yours down. Cloud hosting, on the other hand, can scale up to meet demand, but it’s the most expensive.
Evaluate your web hosting carefully. Don’t be afraid to change to a new provider if you aren’t happy with your site speed. Most providers offer simple migration features, so transitioning won’t be a pain.
Step 12: Host videos externally
Even short videos are quite large, often more than 100 MB. Your ecommerce store probably isn’t optimized to handle files that big, especially if multiple people try to watch them at the same time.
Plus, if you’re on a shared server, they can eat up your space quickly. And in some cases, large videos may violate the terms and conditions of your hosting account.
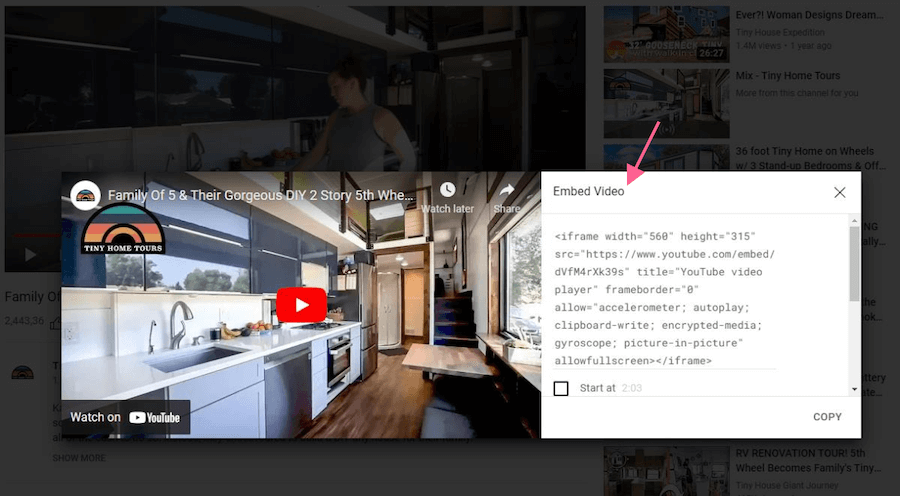
Instead, host your videos on someone else’s platform, like YouTube, Vimeo, or Wistia, then embed those videos onto your pages. Those platforms are designed to handle large videos easily, so they will run smoothly without taxing your server.
You can find the embed code for any YouTube video beneath the video player in the “Share” tab.
Step 13: Prioritize above-the-fold content
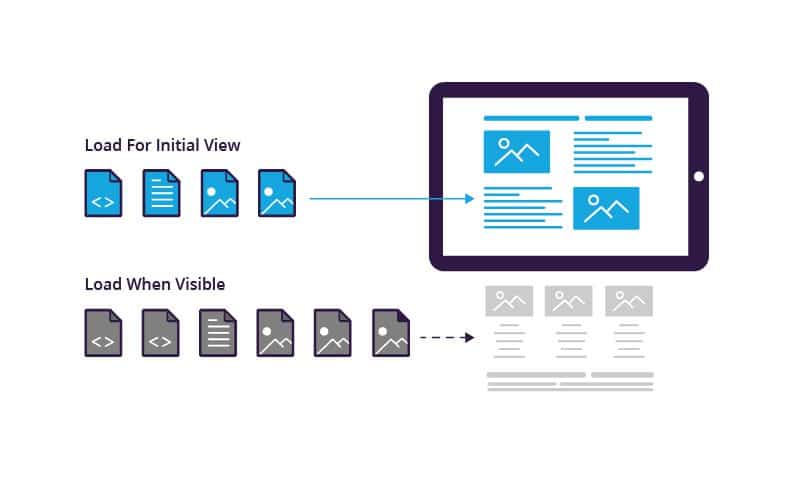
As we said earlier, visitors don’t care when a page loads completely. They only care about when they can use it for their purposes. So it’s smart to have the above-the-fold content load faster than everything else. This lets your visitors dive in.
This practice is called lazy loading or deferred loading. It loads the content that’s within view first so the user can start using the page right away. This method is especially helpful for pages with lots of content that require users to scroll down, such as category pages.
There are lots of ways to add lazy loading to your site. Some platforms and hosting providers offer it by default. You can also get it through third-party apps and plugins. The best solution, however, is to add lazy loading with a JavaScript library. Imperva has a great guide on your options.
If you’re adding scripts to your HTML, you can simply paste them at the end of the page before the </body> tag. If you want them to run throughout your site, add them to your footer file, not your header.
Step 14: Use asynchronous loading
After minifying your JavaScript files, you can continue to optimize them by changing the order in which they load on your pages.
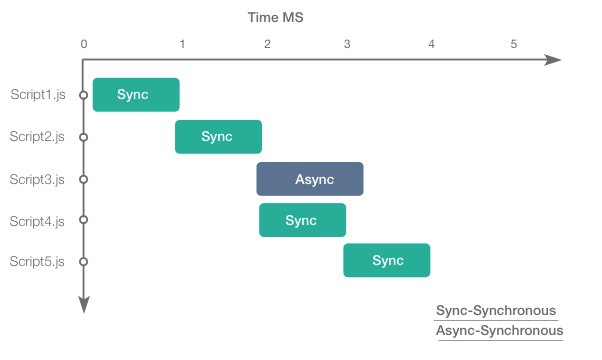
When a browser loads a page, it loads elements as they appear in the code from top to bottom. If it comes across a synchronous script, it will stop loading everything else until it has completed that file. But if that file were asynchronous, the browser could continue loading other elements at the same time.
The following script execution chart from Fresh Marketer shows how that works. Notice how the page loads Script3.js at the same time as Script4.js, but can’t go any further until Scrip4.js is complete. This page would be much faster if all five scripts were loaded asynchronously.
Step 15: Reduce external scripts
Some sites add scripts to pages that make requests on other servers besides the host. For instance, if you place an ad on your site, the script that governs that ad sends requests to some other server to get ad content.
Social media sites are big culprits here too. If you’ve integrated Twitter, Facebook, Instagram, or other platforms, their scripts send out their own requests on every page load. Some platforms let scripts run continuously to refresh whenever new content becomes available.
You can identify any external scripts that are running in Firefox’s or Chrome’s Developer Tools using the Lighthouse performance analyzer. Then you can temporarily block them one at a time to test how the page loads without them. We recommend following Web.dev’s tutorial on identifying third-party scripts. This will help you decide which ones you can go without. (Don’t worry, this is only a browser test. Your visitors will still see the site unchanged.)
Now It’s Time to Improve Your Site Speed
Making sure your ecommerce site speed is fast and reliable could be the most important task you embrace this week. Use the tips in this guide to boost your website load speed right away.
You may not have the technical know-how to do it all yourself. That’s why every ecommerce business needs the help of database administrators, developers, project managers, and other digital marketing professionals.
The good news is that the top six-speed killers can generally be carried out – depending on the amount of code bloat – with minimal need for outside help.
Whatever you do, don’t take this information lightly. We’ve seen ecommerce businesses, both large and small, draw more shoppers and make more sales…simply by improving site speed. Get started today. It’s that important.
Want to go a step further? We’re always happy to help brands get focused on the essentials.
Get your free Stuck Score™ evaluation from The Good.
About the Author
Jon MacDonald
Jon MacDonald is founder and President of The Good, a digital experience optimization firm that has achieved results for some of the largest companies including Adobe, Nike, Xerox, Verizon, Intel and more. Jon regularly contributes to publications like Entrepreneur and Inc.