
How To Build Personas For More Inclusive Design [A 10-Step Process]
We're on a mission to make the internet a better place for everyone. With this 10-step process, we begin to do just that.

As technology becomes more and more integral in our day-to-day lives, we must start to address the gaps and inequities in tech.
Yes, it’s great that we intentionally design through data-driven decisions and processes. But, what happens when data lacks representation?
What happens when we are unable to recognize the needs of diverse users?
What happens when STEM fields are composed of a limited range of voices?
The identities that we hold inform the way we move in the world.
So the ultimate question is: How can we design inclusively to build a better online experience for EVERYONE?
Systemic injustices in tech
Before we dive into inclusive design, we need to understand the way that systemic inequities can seep into technology.
Across the world, history has been full of racism, colonization, sexism, queerphobia, transphobia, classism, etc. The impacts still echo today. They are presented both overtly and covertly, leading to unintentional bias in people and data.
Because of the covert nature of these biases, it’s easy to leave them unaddressed. But this has serious implications.
For example, due to a lack of data collection from minoritized communities, data has historically centered White folx. When this data is used to develop technology such as facial-recognition security cameras, Black and Brown people have a higher chance of being falsely identified via a racially biased algorithm which could endanger their lives.
To explore more about the impact of systemic inequalities of tech, we recommend “Civil Rights Violations in the Face of Technological Change” by Dominique Harrison on POCIT.
Now that you have an introduction to the way that systemic injustice can be perpetuated unintentionally through tech and digital products, let’s talk about countering this.
What is inclusive design and why should it be practiced in business?
Inclusive design is about providing an equitable experience for everyone.
A core principle of inclusive design is to never sacrifice the experience of one community of users for another. The implementation of an inclusive feature should address a need of a minoritized community without negatively impacting the mainstream users.
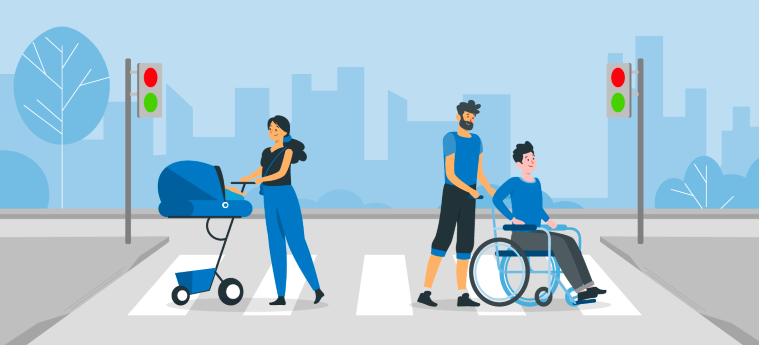
A popular example of inclusive design is sidewalk curb cuts. When sidewalks were originally being designed, users in wheelchairs were not considered. As a result, sidewalks were inaccessible to a section of the population with disabilities.
The introduction of curb cuts created a more universal design, allowing wheelchair users to easily access sidewalks, and did not negatively impact non-wheelchair users. In fact, curb cuts benefited everyone! For example, those pushing strollers could get on and off sidewalks without hassle.
While inclusive and accessible design is an obvious choice from a human perspective, you may be wondering if inclusive design is worth the investment for your business.
The answer is yes!
Inclusive thinking can help promote more innovative designs. Returning to our curb cuts example, the incorporation benefited both wheelchair and non-wheelchair users, expanding the user base and providing a better experience for all.
Designing inclusively from the beginning can also save you money. After the invention of curb cuts, sidewalks had to be redone, which was a huge financial investment. If designers had considered the needs of wheelchair users ahead of time, and designed inclusively, they could have avoided the cost.
Based on this example, you can see that inclusive design should be practiced at the outset and throughout the design process.
The inclusive design process through personas
The following process is built off the work of The Gender Mag Project and is just one inclusive design approach. We’ll focus on creating data-driven user personas to guide the design process of an example project brief.
Why user personas?
User personas help us to step into the perspective of the user(s). We can create multiple personas to understand different demographics, needs, and situational factors.
By basing these personas on accurate and representative data, they can be powerful tools for walking through a user journey to identify the pain points a range of users may experience.
Throughout the example, we will identify an underserved minoritized community for which we hope to design inclusively.
Keep in mind that this process is iterative.
Designing inclusively through personas, step-by-step
Project Brief:
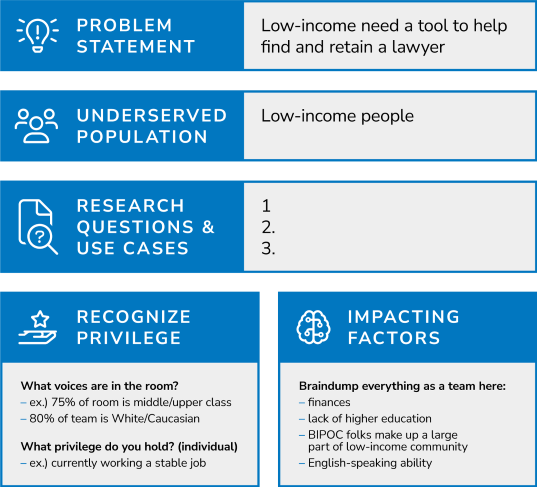
Project Description: Design an app that allows users to find and book a lawyer.
Underserved Population: Low-Income Folx
Mainstream Population: Middle-Class & Upper-Class Folx
Step 1: State your positionality and understandings
The first step of the process is to state what you already know about the needs of low-income folx when finding a lawyer. This should also include what you DO NOT know about their goals and needs. By stating your position, you have a starting point.
You may also find that this step is where some potential assumptions and biases may be named. It is important to name them so that they can be addressed early on.
Step 2: Collect information about the experience of your focus population
Start with some initial research and collect data about low-income folx. Gather research about their barriers to finding and booking lawyers so that you can begin to understand the narrative.
The goal is to get a general understanding of experiences that low-income people have to deal with. We are hoping to answer questions like: What are their motivations? Or what are common roadblocks?
At this stage, you will start to prove or disprove some of the assumptions you stated in Step 1.
Make sure that you perform this step neutrally – do not try to prove your assumptions because you think you know the experience.
You can do this by:
- Doing research as a team
- Using a third-party research service
- Conducting interviews
- Prioritizing primary sources
- Supplementing insights with stats
- Reviewing the insights from your research as a team
Step 3: Develop use cases
Now that you have an initial background about the underserved population, it is time to identify user goals for your design (in this case, the app).
Establishing clear goals based on the data you have collected is important for anchoring your project to realistic and relevant use cases.
When defining use cases, you will define a set of 3-5 cases for the underserved population and another set for the mainstream population. Some use cases may be the exact same for both populations.
Example:
Underserved:
Joe is working multiple jobs and was wrongly accused of a crime. He’s looking for a lawyer, but he barely has any time to find a lawyer the traditional way. He uses the app to expedite the search of finding a lawyer whenever he finds himself with free time.
Mainstream:
Moe is working on Wall Street and was wrongly accused of a crime. He’s looking for a lawyer, but barely has any time to find a lawyer the traditional way, so he has his assistant look for him and book a lawyer using the app.
Step 4: Collect focused data
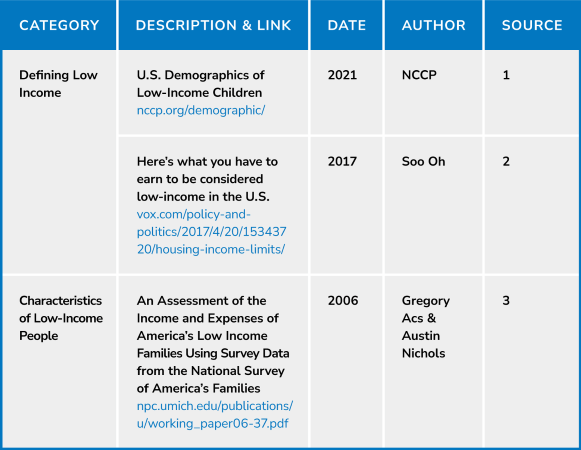
After defining use cases, start reading through articles and conducting user research to find more data to back up the use cases and get an understanding of the needs of users in each.
Make sure to compile a list of resources and data sources in one location.
At this stage, just focus on collecting data and sources; you don’t need to worry about analyzing.
Step 5: Identify themes based on research
In this step, go through your various sources to code data and findings using a thematic analysis approach. This will help you identify different patterns that influence your underserved population.
Collaborate with your team on an affinity diagram to group data and resources together based on common themes that the team sees. Try to reach a general consensus on the themes and placement of data within the diagram. Name the themes appropriately as a team.

Step 6: Define your facets
Based on the themes discovered in Step 5, identify your facets. Think of facets as a scale where you would place a person at a position on the scale based on the attributes they hold.

Typically, you should aim to have 4-6 facets. If you have more than 4-6 themes in your affinity diagram, reassess the way you grouped data to see if you can merge themes. Otherwise, identify themes that seem to be most prevalent and relevant to the project.
Examples of Facets for Low-Income Folx:
- Financial Insecurity/Security
- Job Instability/Stability
- Access to Support Services
- Mental Health
- Access to Transportation
Facets help us understand how people experience things at different levels. A low-income person can have high job security but low access to support services.
Enjoying this article?
Subscribe to our newsletter, Good Question, to get insights like this sent straight to your inbox every week.
Step 7: Create your personas
Now that you have your facets, it is time to create your personas! Start by following the standard persona development process.
Your output might look something like this:
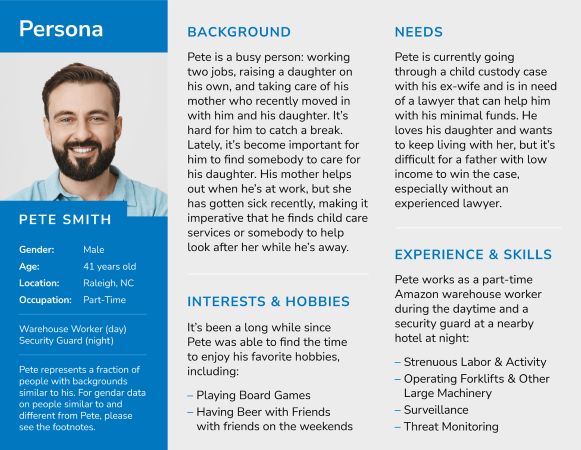
Once you create the backstory of your persona, analyze it using the facets and data collected in earlier steps.
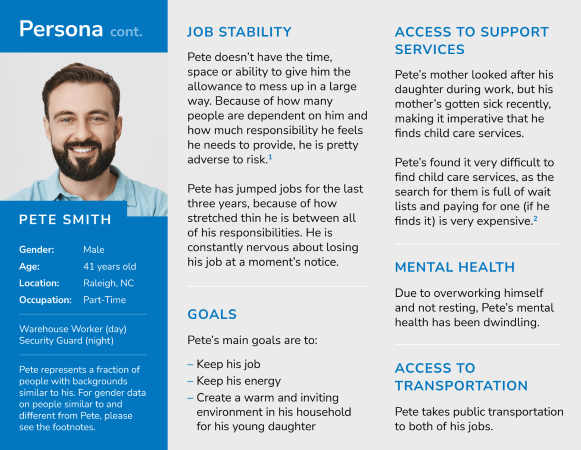
For example, in Pete’s story above, we highlight that he has recently lost his mother’s childcare help, and he can’t afford other childcare services. This is a piece of Pete’s persona that is analyzed through the facet of “Access to Support Services.”
Additionally, data helps keep us true to real facts. You can see in Pete’s persona that we note data sources or statistics that informed our insights. Do the same by adding details about your persona based on the data under that theme in the affinity diagram (from step 5).
You can always change the basic information or story of your persona, but your data-driven facets should remain constant throughout any adaptation of your persona.
Step 8: Present your personas
Congratulations! You should now have your personas to understand different user experiences.
Present these personas to your team and make sure everyone understands the importance of each facet. Clear up any misunderstandings and emphasize the importance of using the underserved persona to test products.
Because of the data-based foundation of your personas, testing with them will help reduce bias.
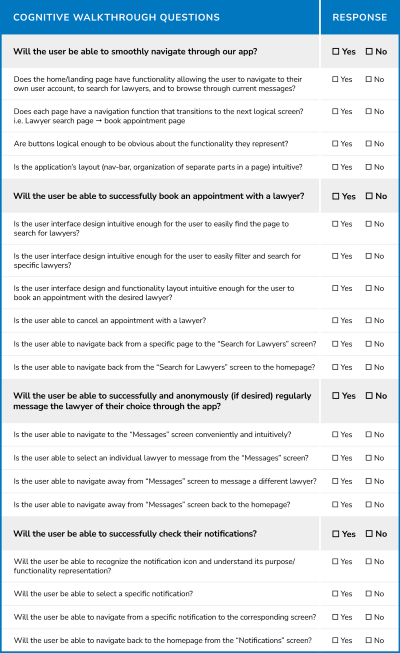
Step 9: Perform a cognitive walkthrough with the personas
Now it’s time to test your app or technology for inclusive design. Use your persona to understand the user journey for the underserved population vs. the mainstream population.
Cognitive walkthroughs are a powerful methodology for identifying pain points and differences among users. As you perform the walkthrough with your persona(s), note down where differences exist and assess whether they are a pain point.
Whenever you identify a pain point, use the facet breakdown in your persona to explain how the pain point impacts the user. Use the facet to guide and inform design suggestions for the next iteration of your design.
It is recommended to do a cognitive walkthrough with a team where the roles of “user,” “researcher,” and “computer” are clearly defined. Additionally, the team should hold each other accountable when the “user” steps outside of the persona’s shoes.
Step 10: Keep iterating on your personas
The great thing about developed personas is that they are adaptable to different projects.
Maintaining a collection of personas can help save time by building off personas from past projects.
Just make sure to keep personas up-to-date and iterate as needed based on how effective the user persona is for helping you design inclusively.
Limitations and things to keep in mind as you start an inclusive design journey
So, now you know the 10-step inclusive design process.
- Step 1: State your positionality and understandings
- Step 2: Collect information about the experience of your focus population
- Step 3: Develop use cases
- Step 4: Collect focused data
- Step 5: Identify themes based on research
- Step 6: Define your facets
- Step 7: Create your personas
- Step 8: Present your personas
- Step 9: Perform a cognitive walkthrough with the personas
- Step 10: Keep iterating on your personas
But, while this process is a great starting point for practicing inclusive design, there are still a few limitations.
Make sure to review these limitations and add to your inclusive design toolkit with each project to remain aware and avoid misguiding your research.
- Intersectionality: A major limitation of this process is that it does not do the best job supporting intersectionality which is a critical component of inclusivity. Intersectionality, a term coined by Dr. Kimberlé Crenshaw, emphasizes that people are not monoliths; our identities are interconnected and multifaceted which leads to varying experiences and forms of injustice. For example, Black women have a different experience from Black men and White women due to the intersection of their racial and gender identities. Not only do Black women face stereotypes about Black folx like Black men and misogyny like White women, but they also have a unique set of struggles specific to Black women.
When we ignore these intersectional experiences and human diversity, we could end up doing more harm than good. More work needs to be done to define a design process that can address intersectionality, but in the meantime, it is important to understand that people are not one-dimensional. These personas provide a lens for looking at user experiences, but they do not create a multi-dimensional view of user needs. - Centering: Another thing to keep in mind when using this approach to inclusive design is the act of centering. You never want to center a mainstream user in a way that presents them as the “norm.” This did not present as much of an issue in the project example defined above, but it is an easy pitfall when it comes to minoritized identities like race, gender, sexuality, religion, etc.
For example, it is important that products do not center White users by making them the mainstream population while having the underserved population be Black users. Instead, the mainstream users should be non-Black users. Similarly, when setting the underserved population as women, the mainstream users should be non-women users. This helps reduce the erasure of those outside the binary. - Scope of Specificity: Another thing to be aware of is what scope of specificity to use in describing your underserved population. Labels can be invisibilizing to different communities. For example, if you are defining your underserved population as Asians, you should be mindful of the diversity and range of experiences within that population.
For example, Pacific Islanders are often grouped with Asians, but they have different experiences than other Asians. Even within “Asians,” there are different groups, such as South Asians, Southeast Asians, Filipinx, East Asians, etc. To avoid the danger of a single story, you should be conscious of how you are defining the underserved and mainstream groups because centering practices matter.
Inclusive design is an integral part of any good online experience
As you improve your efforts and workflow around inclusive design, here are two final strategies to integrate into your work culture.
First, you need diverse voices in the room. You do not necessarily have to have someone from the underserved population working on the project, but having a diverse team can lead to different insights and feedback.
Second, train your team to be comfortable with having conversations around topics like race, gender, class, etc. These conversations should be normalized and encouraged in the workplace.
This inclusive design thinking and process is just a starting point for bridging the gap between tech and minoritized communities.
There is still a lot more work to be done, but by incorporating practices like this, we are taking steps and doing the work to get there.
Remember, by implementing inclusive UX design practices, you make the internet a better place for everyone.
Enjoying this article?
Subscribe to our newsletter, Good Question, to get insights like this sent straight to your inbox every week.
About the Author
Karthiyesan Balasankar
Karthiyesan is a UX Strategist at The Good. They use their skillset and passion for user experience research and design to address the gaps between technology and minority communities.